"My very own theme tutorial" by Bob Starck-Higgins
You can download this tutorial as a zipped file in RTF format from: http://www.lighttek.com/bsh tutorial.zip
Discussion forum for this tutorial: http://www.lighttek.com/forum/forumdisplay.php?fid=12
Bob Starck-Higgins direct email: rhigga@softek.fsnet.co.uk
This is a basic tutorial for making your very own theme and it is assumed that you have some knowledge of graphics manipulation and creation,which i cant go into otherwise i shall be here for months.For my part i use Microsoft Image composer which comes with Frontpage and Paint shop pro7.For the purpose of this tutorial we shall use solid colours for buttons and forms and i will refer to my theme 'The Look' as a cross reference so you can see how the various parts are constructed and placed.
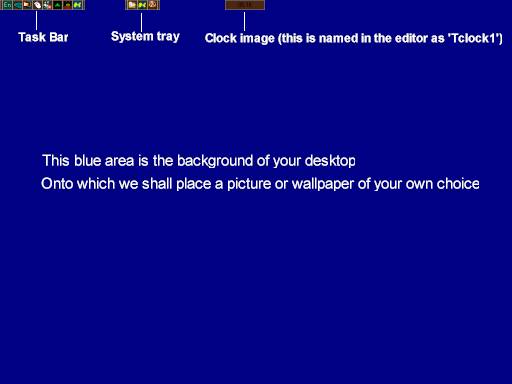
Ok,so we have Talisman installed and we are using the program in SHELL mode.You know,click on the shell switcher form the talisman menu and check 'Talisman' which is checked by default.You are now in Shell mode and we can see the Talisman Taskbar,the System tray and the clock.Lets make your own theme.Right click on the desktop and the Talisman menu appears,go to 'NEW' then 'Theme' and select 'Empty screen'.You are now asked for a name for your theme,call it 'My Theme' click OK. You should now have the default desktop as shown below.Before I go any further,when I refer to a name in this text,i shall display it thus 'Example' When you enter a name,do not include the speech marks.
Ok,what now! well lets deal wih your desktop first.In the editor this is known as 'desktop0' if you right click on the blue area and select 'properties' the Editor will appear and the 'desktop0' will be highlighted with two red arrows.Here you can change the properties of your background.You can change the colour or insert a wallpaper of your choice.Note the backgound is set to 'Centered, by default.I work at a resolution of 1024x 768 therefore any picture inserted as your background if less or more than this resolution can be centered,tiled or stretched to fit the screen.For the moment lets just change the colour to Dark Grey.Click the colour box select Dark Grey and click 'Redraw'.The background has now changed to Dark grey.( see below).

Now close the Editor.In my theme 'The look' you will see at the bottom a tortoise shell looking bar covering the base of the screen,the size is 1024 x 72.lets make and place this on your desktop.In your graphics program make a solid colour picture,make it black at a size of 1024 x 72.and save it to the theme folder 'My theme' in the main Talisman 'Themes' folder named as 'Taskbar'.You can save it as a bmp or jpg as its a solid colour it really does not matter.A picture such as the one in 'The look' will look better in a bmp format,however the choice is yours.Just bear in mind that a bmp will be a larger file size than a jpg,the choice is yours.
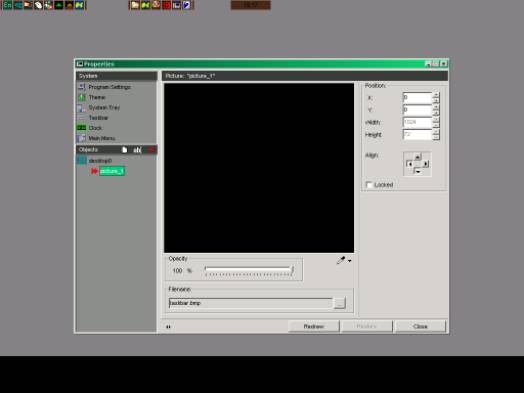
Now lets put it on the desktop.Right click on the desktop and in the menu select 'NEW' then click on 'Picture'.The editor properties for 'Picture_1' have now appeared.In the filename dialogue box click the 'browse' button and navigate to the 'My Theme' folder and select the picture you named 'Taskbar'.An information box appears, 'copy to theme folder' select 'Yes'.Now check 'Allign arrows 'Left' and 'Down' and click 'Redraw' your Black Taskbar will now appear at the bottom of your screen.So far so good.
Take a moment to look at the Taskbar at the bottom of my theme 'The Look' I have identfied the various pictures and shapes that make it up.

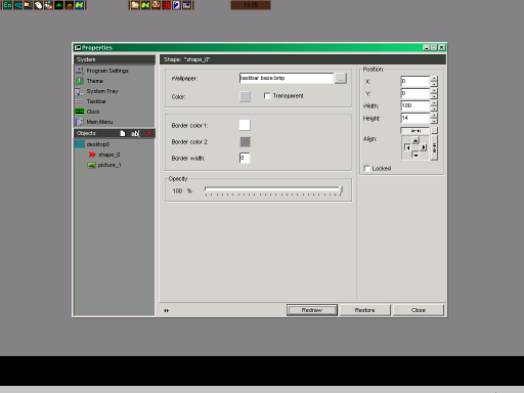
Lets now make 'Shape_0'. A shape rather than a picture is useful when using different resolutions as the shape you make is Tiled rather than a single picture image and can be used as a border around the entire screen.In your graphics program make a solid colour shape say Light grey @ 150 x 14. As we are placing this shape at the bottom of the screen horizontaly,the actual width of your shape can be just 1 pixel wide,the reason being that as the shape is repeated,the width size does'nt really matter.It depends mainly on the pattern of the shape.When you have made the shape,save it as 'taskbar base' to the 'My Theme' folder.Ok lets put it on the screen.
Right click on the desktop and from the menu select 'new' then click 'shape'.Aha! a small grey square has appeared.Right click on it,select 'properties' and you are now ready to define the shapes configuration.In the wallpaper box click the browse button,nav to the 'my theme' folder and select'taskbar base'.Now in the 'position' dialogue area make the following changes, x change to 0,y change to 0,leave the width at 100( remember the width does'nt matter horizontally likewise the height does'nt matter vertically) change the height to 14 ( being the height of the shape you made) click the 'fullwidth' button,then check the left and down arrows.Click 'Redraw' and hey presto! the shape appears at the bottom of the screen. Close the editor window.So far so good!!
Next...picture_2. ( refer back to 'The look' Taskbar above)
In your graphics prog create a picture in a solid colour,say,yellow,@ 286x 46 and save it as a bmp named 'System back'.
Now right click on desktop,select 'NEW' and click 'picture'.In the 'filename' box click the browse button and nav to select 'System back' form your folder.
Once selected you will notice that Talisman has automatically put the picture dimensions in width and height boxes.now select the left and down arrows,x and y co ordinates should be set at 0.Click 'Redraw' and yes nothing has appeared or at least you cant see it because your 'system back' is hidden behind the 'taskbar' picture.
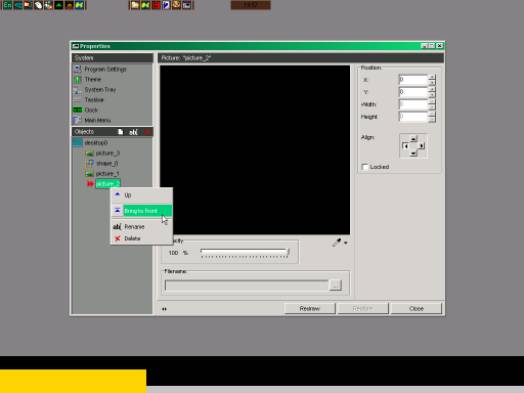
Ok,you need to bring it to the front,so,right click on 'picture_2' in the 'Objects' column,select 'Bring to front',click 'Redraw' and 'System back' will appear.
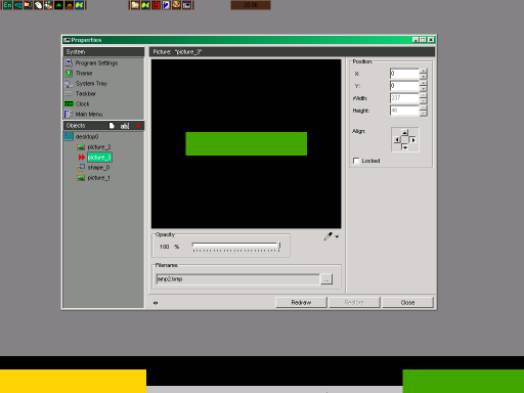
Next...picture_3. ( refer back to 'The look' Taskbar above)
Create a picture as before and save it as 'Amp2' This time make the size 237x46 and the colour green so we can see all the different components of the theme.
To get the picture on the screen,proceed as above with the following exceptions, 'Allign' arrows should be right and down.Remember if you cant see a picture once you have clicked 'Redraw' its because its hidden behind something else.you can rearrange the picture orders by right clicking on it in the 'Objects' column as before,alternately as you add each picture or shape you can set its order then and there.Note,as you play around with the objects,they may change position in the menu order,dont worry about that,as long as its there thats fine.
Great,thats the pictures and shapes in the theme taken care of now lets turn our attention to the Taskbar,tray and clock.

Pictures for the system tray can be any reasonable size,say 24x24. in 'The Look' i have used a very small size of 13 x 13 you shall do the same.
In your graphics prog make 3 pictures each @ 13 x 13. Make them Dark blue,Mid blue and light blue consecutively.These will provide the 3 button types,Normal,Highlight and Click.The same goes for the Taskbar buttons.How you make them look when reacting to the mouse is up to you.Now you have made your buttons we need to save them to your folder,or do we.Talisman property editor has the ability to copy and paste images for buttons and once inserted it will automatically copy them to your theme folder named for example thus.... desktop0_button_3.btn3.(More on .btn3 later). Lets save our buttons to the folder and select them from the Editor.Save the Dark blue btn as 't_tray1' the Mid blue as 't_tray2' and the light blue as 't_tray3'. Remember dont include the speech marks.Also with the System and taskbar buttons there are 2 further button options,they are 'First' and 'Last' also known as 't_tray4' and 't_tray5.These are buttons that go at the front and rear of the System Tray or Taskbar and if clicked on and held,enable you to move the tray or taskbar anywhere on the screen (Dragging) I use them sometimes depending on the particular graphics effect.An example of these can be seen on the system tray in my V ROD XP theme.
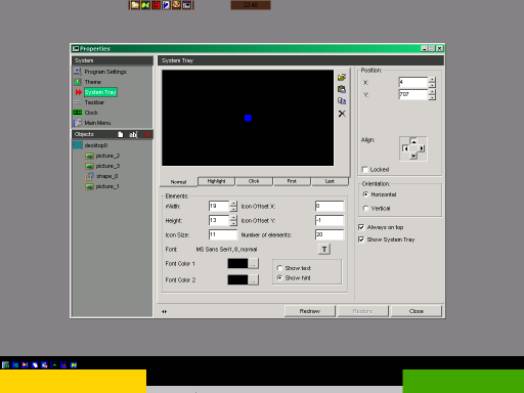
We will now set up the Tray.Right click on the desktop,select 'properties' and in the editor under 'system' click 'System tray'.You are now looking at the dialogue for the tray configurations.Click the Normal button tab then browse to and select 't_tray1' from the 'My Theme' folder.Do the same with the 'Highlight' and 'Click' tabs inserting 'T_tray2' and 'T_tray3' respectively.We are not using 'First' and 'Last' buttons here so click on each tab in turn and click the delete button.The 'Position' make x = 4 and y = 707,In the 'Elements' dialogue make the width = 19 the height = 13 and the icon size 11.The icon offset buttons allow you to position the system icon within the button area so that you may see all of the icon when,as we are,using an usually small button. Make icon offset x = 0 and icon offset y = -1(minus 1) .'Align' up and left arrows. Orientation should be Horizontal and uncheck always on top.I shall explain why later.Check 'Hint' This will tell you what the icon represents when you mouseover it.Finally click 'Redraw' and the tray will reappear in its new position.
Ok,why did i uncheck the 'Always on top' checkbox.With talisman you can tell it exactly how much of the desktop you wish to use for open windows.I do not particulaly need to see the tray at all times so when i set the screen area, i cover the tray icons and if i didnt uncheck 'Always on top' the tray icons would show through onto my windows.Lets set the screen area.
When I say open the editor,im hoping you now know how to do this,so.......open the editor and click the 'Theme' button under 'System'. now check the
'Use screen workarea' box and insert the number 46 in the 'Bottom' box,click 'Redraw'. Next time you open a window it will only open just above pictures 1 and 2. and will not show the system tray.Now if you want to see the tray,increase the 'Bottom' number to say 70...try it!!
Now the Taskbar buttons.Same principals as the tray buttons but different sizes.Remember,all these dimensions are the same as those in my theme 'The Look' so you can make direct comparisons.Ok,go make 3 taskbar buttons in dark red,mid red and light red @ 45 wide x 40 High and save them to your folder as 't_task1' , 't_task2' and 't_task3' respectively.Again there are no first and last buttons.
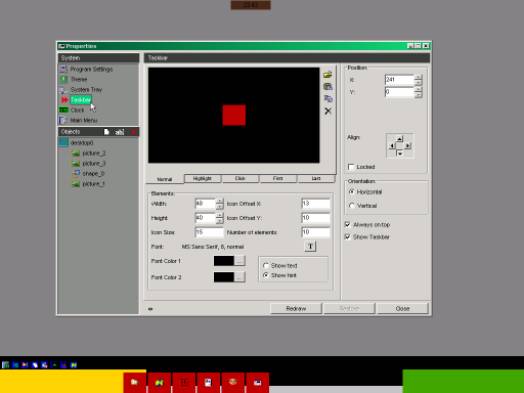
Open the editor and click on the Taskbar button.Add the Taskbar button pictures for Normal,Highlight and Click as for the System tray( remember to delete first and last buttons) and make the following changes....
'position' x = 241 and y = 0, 'Align' check down and left arrows, 'Elements' width = 48,Height = 40, iconoffset x = 13, icon offset y = 10,change 'Number of elements' to 10 and make the icon size 15.Note that when the number of buttons open on the taskbar reaches 10 the next button (11) will open above the first button.Also you may wonder why i have set the width of the button to 48 instead of 45 which was the size you made it,This just shows you that you can spread the buttons apart both horizontally or vertically should you so wish.The same applies to the system tray.Now click 'Redraw' and the Taskbar will move to its new position.
The clock can now be approached.Make a button 82 x 28 and colour it white and save it as 't_clock1' which is already in your folder.Open the Editor and in 'system' click clock.You will see that after saving your new picture,Talisman has already changed it for you.The changes you can make here are pretty obvious,check out the anologue tab.We are not showing an anologue clock in this theme so all we need to do is change the clock position thus....x = 107 and y = 734 'Align' up and left arrows and click 'Redraw' The clock now takes up its new position.
