<<<< First page Next page >>>>
There are just 4 More buttons to add under 'Desktop0' and they are the Start,Quicklaunch,Minimise and .mnu button for your chosen music player.I'll get to the.mnu later.
From the Talisman 'New' menu,you have a choice of 'Button' or 'Textbutton'.The editor properties for both types of button are identical,however if you select 'Button' Talisman will automatically show a default Icon as well as the reference text which accompanies the button.Selecting 'Textbutton' will give you just that....Text.
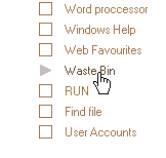
Therefore,if you are making a button for say for Internet Explorer,use the 'Button' option,whereas if you dont want an icon but wish to show your own made up button,use 'Textbutton'. When you edit a button there are various options open to you.With the 'Button' option you can delete the text and show just the icon or move the text any where around the icon and so it is with the 'Textbutton' option,you can have just text or introduce a picture button and place the text around it.Both of these are used in 'The Look'. All the Textbuttons shown on the right of the desktop have a small square to the left of the text and when you mouse over the text,it changes to an arrow.Basically therefore,any button option you choose can be edited to look exactly the same.
Ok,a word about the .btn3 file used by Talisman for buttons.The best way to introduce a button image to Talisman Editor is by copy and paste method because once you have pasted an image, remember there are 3 button images for each button,Talisman takes the 3 different buttons ( Normal,highlight and click ) and makes then into an ,btn3 image.This image consists of the 3 button states,but instead of each state saved as a single image,Talisman joins them together in one image thus
![]()
If you then need to edit any of the single buttons,it is a simple task to open the editor,open the properties for the button to be edited,copy it and paste it directly into your graphics program, fiddle around with it, then when your happy with the new look, copy it and paste it directly back to the editor.Once pasted back and after you have clicked 'redraw' Talisman will then update that particular buttons .btn3 image.Job done!!
Back to your theme. The next button to make is the Start button.In your Graphics program make 3 buttons @ 82 x 28 in Dark orange,mid orange and light orange.Once you have made them,leave them there for the moment.Now depending on where you right click on your desktop to insert a new button,thats where Talisman will place it,you can then fiddle it into place using the Editor.So,Rightclick the desktop about 2cm to the left of the clock image and select 'New' then 'Textbutton'. 'textbutton_0' has appeared right where you clicked.Yes!! Good.
We shall now insert the images and configure this button.Put your mouse over 'textbutton_0' and rightclick.select 'properties' from the menu and the Editor opens showing this buttons configuration.Firstly in the 'TEXT' box change the text from textbutton_0 to 'Start' and change the colour to white.Notice you are working on the 'Normal' Tab.Now copy the Dark orange button from your graphics prog and paste it into the Editor.
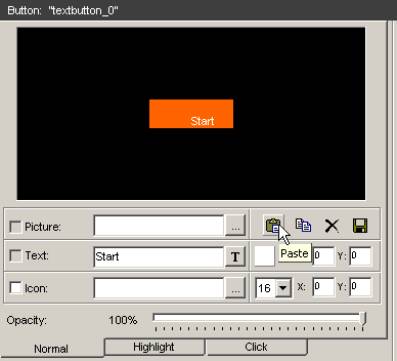
Notice that the 'TEXT' box co-ordinates are showing 0.Put your mouse over the word 'start' on the orange button,left click and HOLD.A little white box has appeared on your cursor because you now have hold of the text.Move the text to the centre of the button and release the mouse button.Note that the 'TEXT' co-ordinates have changed accordingly.Now paste the images for 'highlight' and 'click' buttons.You do not need to place the text on these buttons as they take the settings from the 'normal' button,you can if you wish change the text colour.When done,click 'Redraw' and your start button now replaces the Text next to the clock.You now need to position the button.This can be done by left clicking and holding on the button,you can then drag it to where you want it. The actual x y co-ordinates i want you to insert are x = 4 y = 734, 'Align' left and up arrows.Click 'Redraw' and close the editor.
Three more buttons to make,quicklaunch,minimise and the music player(Amp).
In your Graphics prog make these buttons as follows;
Quicklaunch = 3 buttons in shades of green @ 22x22
Minimise = 3 buttons in shades of blue @ 17x17
Amp = 3 buttons in shades of yellow @ 45x40
Once you have made these buttons, follow the steps you made for the start button with the exception of the 'Start' text.With these 3 buttons i want you to delete the text from the 'TEXT' box completely.The co-ordinates for these buttons are as follows;
Quicklaunch.....x = 85, y = 736, 'Align' left and up arrows.
Minimise all.....x = 204, y = 12, 'Align' left and down arrows.
Amp...............x = 192, y = 0, 'Align' right and down arrows.
Having completed the instalation of your buttons the Taskbar should now look like this;


Now we shall take each button and give it a command function.A button can react to your mouse in 4 different ways thus;
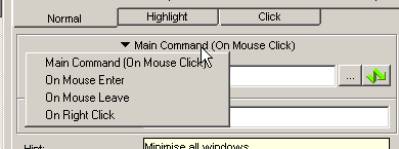
You can assign a different process or command to each option.We will consentrate on Main Command or left click and On mouse enter.
Main command means you need to Left click on your button in order for it to process your command.Pretty obvious really and the option most used.
On Mouse enter gives you the ability to process a command simply by mousing over the button. An excellent way to use a seemingly transparent button to say, open a menu form. Similar to the Autohide feature of the windows taskbar.Soon we shall be adding 2 forms to your theme and i will give you an example of this then.
I shall now give you directions on how to install a command to a button using the main command.Right click on the 'Start' button and select properties from the menu
Traditionally this button shows you the Talisman Mainmenu,so in the Editor now open for this button,click the square button immediately to the right of the 'Command' box.
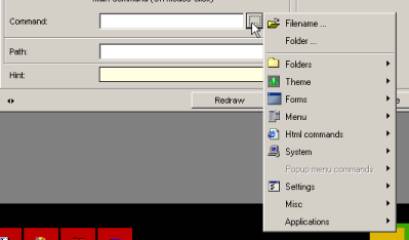
If you select the 'Filename' you can then browse your files for any program .exe file you wish this button to open,alternately,if you choose 'Folder' you can browse and select a particular folder such as Windows.We shall select 'Menu' and then click 'mainmenu' at the top.Click 'Redraw' and so be it ,now when you click the 'Start' button the Mainmenu appears.Additionally you may choose where the menu pops up around the button by adding an additional command such as this,
'mainmenu menutop' try it and you will find that instead of the menu part covering the button,it pops up above it.Same goes for right,left and bottom.
Ok its time for you to browse that 'Command' menu so now configure the other 3 buttons in the same way but choosing the following commands
Quicklaunch button find and choose 'quicklaunch menu'
minimize button find and choose 'minimise all windows'
Amp button we deal with now.It is a good idea for an otherwise Blank button to identify what it does by way of a hint.if you wish to identify a button with no icon or visible text in this way,simply type the hint in the hint box provided ( See above pic ).Do this for the quicklaunch,minimise and Amp buttons.
We are now going to make a .mnu menu for the Amp button.This menu will enable us to launch your fav music player and give it commands such as play,pause,stop etc.
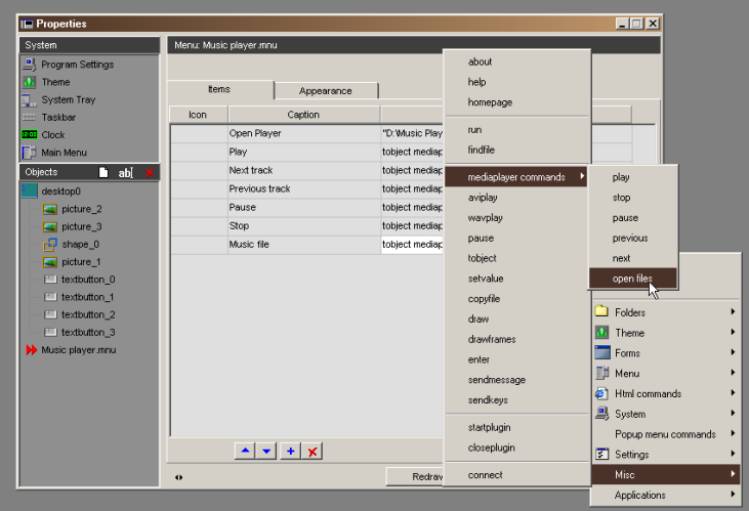
Click start,new then 'menu'. You must now give your menu a name,call it 'Music Player'. Now in the open Editor,click on the plus sign six times to add 6 more bars.Including the bar thats already there,this gives us 7 command buttons.We now need to type in the 'Caption' and give it a command.Click in the first caption box and type 'Open Player'. Now click in the command box and 2 buttons appear on the right hand side.The first is your browse button,the second is the script button.We only need to use the browse button at this time.Click the browse button and navigate to the .exe file of your fav music player.I use Winamp but you can use any of your choice.
Highlight each 'caption' box in turn,enter the following in this order,Play,Next Track,Previous track,Pause,Stop and finally,Music file.
Now click in the command box next to 'Play',click the browse button and from the menu choose 'misc', then ', 'mediaplayer commands', then choose,Yes! you guessed it,
'play'. Now follow exactly the same actions and complete all of the controls.Your Editor should now look like this;
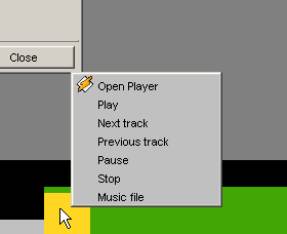
Click the 'Redraw' button and close the editor .Your .mnu file is complete so all we need to do now is insert the command to open this menu from the Amp button sitting on picture_3 ( The Yellow button).Right click on this button and choose 'properties' and,again,the Editor will open showing the properties for this button.Click the browse button to the left of the 'Command' box,navigate to the 'My Theme' folder where you will now find 'Music player.mnu'. Click on this file to enter it in the command line.Now in my case when i did this,the following path was entered "F:\Talisman2\themes\My Theme\Music player.mnu" Yours will naturally be a different path.If you were to leave this
as the command line,when you click on the Amp button,nothing will happen because no two people are going to have the same path,unless by a complete fluke,so we need to physically adjust this command line to show 'Music player.mnu' ( remember,DONT include the speech marks).then click 'Redraw'. Now if you click the Amp button
the menu appears thus;
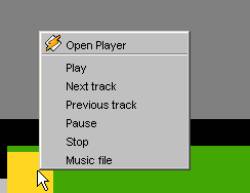
If you would like to seperate the individual buttons shown on the menu,you may add a seperator.We shall place a seperator after the 'Open Player' button.
Open the Editor and in the 'objects' column at the bottom select 'Music Player.mnu'.Ok,we are back to the menu screen for this.mnu.Click the plus sign once and a new bar appears at the top.In the 'Caption box,insert a dash thus, '-' , then in the command box,insert a equals sign,thus, '=' .Whilst the 'Command box' is still highlighted.click the Down arrow and this bar will drop down below the 'Open player' bar.Click 'Redraw' .Now when you click on the Amp button you will see that you have inserted a seperator.
As far as the look of the .mnu menu goes, you can select the 'Appearance' tab and play around with it to select colours etc. of your choice.
<<<< First page Next page >>>>